Upper Arm Tattoos for Men
Table of Content
Table of Contents
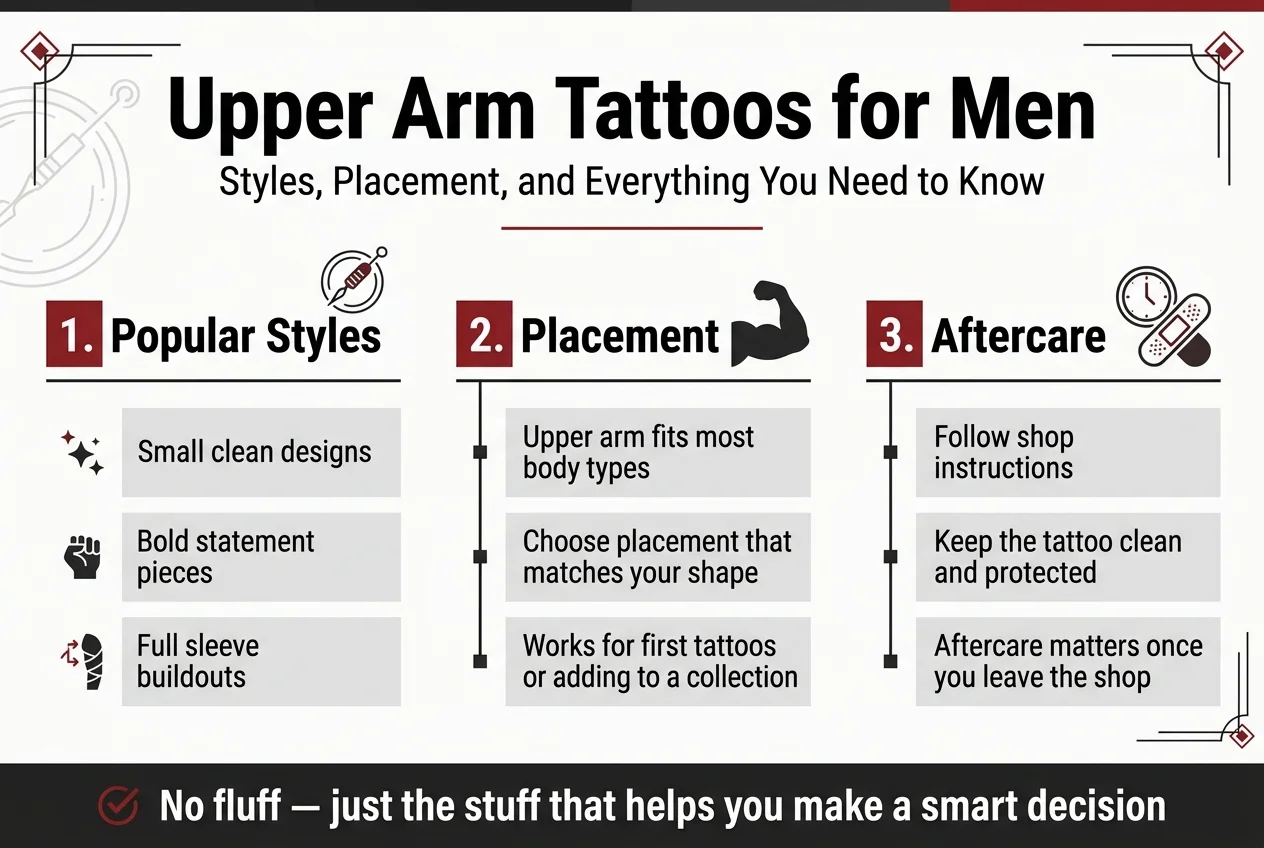
Upper Arm Tattoos for Men: Styles, Placement, and Everything You Need to Know
If you’re a man thinking about getting your first upper arm tattoo — or adding to a collection you’ve already started — you’re in the right place. Upper arm tattoos for men are one of the most popular choices out there, and for good reason. The space works well for everything from small, clean designs to full sleeve buildouts.
This guide is built for guys at any stage of the process, whether you’ve got zero ink or you’re planning your next piece. We’ll walk you through the most popular upper arm tattoo styles right now, how to pick placement that actually suits your body type, and what solid aftercare looks like once you leave the shop.
No fluff — just the stuff that actually helps you make a smart decision.

Popular Upper Arm Tattoo Styles to Inspire Your Next Ink
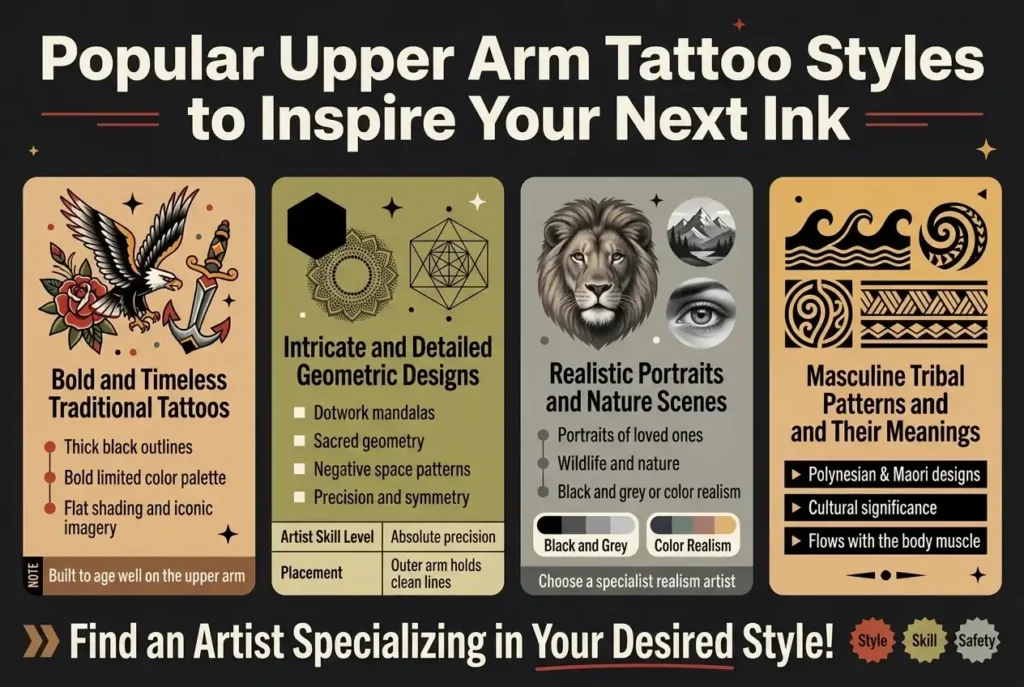
Bold and Timeless Traditional Tattoos
Traditional tattoos — also called Old School or American Traditional — have been a staple of tattoo culture for over a century, and they show absolutely no signs of going anywhere. There’s a reason why sailors, soldiers, and working-class men gravitated toward this style decades ago, and why it still dominates upper arm real estate today.
The hallmarks of traditional tattoos are hard to miss:
- Thick, confident black outlines that hold up over decades
- A bold, limited color palette — think deep reds, greens, yellows, and blacks
- Iconic imagery like eagles, panthers, anchors, daggers, roses, and pin-up figures
- Flat shading with minimal blending or gradients
What makes traditional tattoos perfect for the upper arm is their staying power. The bold lines resist blurring over time far better than delicate fine-line work, meaning your tattoo still looks sharp 20 years down the road. The upper arm’s relatively flat, broad canvas also lets traditional designs breathe and show off that classic silhouette without distortion.
Why Men Keep Coming Back to This Style
Traditional tattoos carry a sense of history and meaning that feels earned. An eagle clutching arrows speaks to strength and freedom. A panther mid-pounce communicates raw power. A ship in a storm nods to navigating life’s chaos. These aren’t just pretty pictures — they carry weight.
If you’re getting your first tattoo, a traditional piece on the upper arm is one of the safest bets you can make. The aesthetic is universally respected in tattoo culture, the aging process is forgiving, and you have a massive pool of talented artists who specialize in this style.
Intricate and Detailed Geometric Designs
Geometric tattoos have exploded in popularity over the past decade, and the upper arm is arguably their best home on the body. Whether you’re drawn to sacred geometry, minimalist linework, or complex mandala-inspired patterns, this style rewards anyone who appreciates precision and structure.
What Geometric Tattoos Actually Look Like
The range within this style is huge. You might go for:
- Dotwork mandalas built entirely from thousands of tiny dots
- Sacred geometry like the Flower of Life, Metatron’s Cube, or the Sri Yantra
- Blackwork geometric shapes — triangles, hexagons, and polyhedrons stacked and layered
- Negative space designs where the skin itself becomes part of the pattern
- Geometric animals where the creature is built from angular shapes and lines
One of the big appeals of geometric tattoos is the way they interact with the body’s natural contours. A well-placed geometric sleeve or half-sleeve wraps around the upper arm in a way that feels almost architectural. Artists who specialize in this style think carefully about how the angles and symmetry play with the arm’s curves when flexed or relaxed.
Things to Consider Before Going Geometric
| Factor | What to Know |
|---|---|
| Artist Skill Level | Geometric work demands absolute precision — even tiny misalignments are visible |
| Healing | Fine linework can spread slightly as it heals, so choose an experienced artist |
| Placement | Flat areas of the outer arm hold clean lines better than the inner arm’s softer skin |
| Touch-ups | Dotwork and fine lines may need refreshing after several years |
If you want something that looks modern, almost architectural, and turns heads for its sheer technical complexity, geometric designs on the upper arm deliver every time.
Realistic Portraits and Nature Scenes
Realism tattoos are basically a flex — both for the artist who creates them and the person wearing them. When done right, a realistic portrait or nature scene on the upper arm looks like someone pressed a photograph directly into your skin. The detail, the shadow play, the texture — it’s genuinely impressive every single time.
Popular Realistic Subjects for the Upper Arm
Men tend to gravitate toward a few recurring themes in this style:
- Portraits of loved ones — parents, children, or partners
- Wildlife and nature — lions, wolves, bears, eagles, and tigers remain perennial favorites
- Skull and anatomy-based imagery with hyper-realistic depth
- Landscapes and scenery — mountain ranges, forests, ocean waves
- Cultural icons — musicians, athletes, or historical figures
The upper arm is one of the best spots for realistic work because it gives the artist enough room to build proper scale and depth. A realistic lion’s face, for example, needs space to show the detail in its mane, the glint in its eyes, and the texture of its fur. Squeeze it into a small area and the impact is lost entirely.
Black and Grey vs. Color Realism
Both approaches produce stunning results, but they have different vibes:
- Black and grey realism tends to feel timeless and dramatic. The high contrast creates a cinematic quality, almost like an old film photograph.
- Color realism brings subjects to life with skin tones, vibrant greens, or the warm gold of a lion’s coat. It’s more visually striking at first glance but requires more maintenance over time as colors can fade.
The single most important thing with realistic tattoos is choosing your artist carefully. This isn’t a style where a generalist tattoo artist will cut it — you need someone who specializes exclusively in realism and has a portfolio full of healed work to back it up.
Masculine Tribal Patterns and Their Meanings
Tribal tattoos have roots that go back thousands of years, cutting across cultures from Polynesia and Samoa to the Maori of New Zealand, the indigenous peoples of the Philippines, and countless others. Far from being just decorative, traditional tribal markings were — and in many communities, still are — deeply tied to identity, social standing, spiritual protection, and rites of passage.
Major Tribal Styles Worth Knowing
Polynesian / Samoan (Pe’a and Tatau)
Polynesian tribal work is probably the most recognizable tribal style in Western tattoo culture. It uses bold black fills, intricate repeating patterns, and symbolic motifs like:
- Enata (human figures representing people, gods, or ancestors)
- Shark teeth (protection, guidance, and adaptability)
- Ocean waves (strength, continuity, and the sea’s connection to Polynesian life)
- Turtles (navigation, family, and long life)
Maori (Tā moko)
Maori tattoos are among the most distinctive in the world. Traditional tā moko uses curved, flowing lines and spirals (called koru) that tell the story of the wearer’s genealogy, tribal affiliations, and personal achievements. The designs are never generic — they are deeply personal statements of identity.
Filipino (Batok)
The Kalinga people of the Philippines have practiced batok for centuries. Their geometric patterns mark warriors, protectors, and community leaders. The upper arm and shoulder were prime placement areas, signifying strength and readiness for battle.
Respecting the Culture Behind the Ink
This is a topic worth taking seriously. If you have direct ancestry or cultural ties to a tribal tradition, getting a tattoo rooted in that heritage is a genuine and meaningful choice. If you don’t, there’s an ongoing conversation in the tattoo community about cultural appreciation versus appropriation that’s worth understanding before you commit.
Many Polynesian and Maori tattoo artists — both those within those communities and those who’ve trained under them — are happy to create custom designs that draw on tribal aesthetics while being crafted specifically for you rather than replicating sacred symbols you have no connection to.
When done with awareness and intention, tribal upper arm tattoos remain some of the most visually powerful and deeply meaningful designs a man can wear.
Best Placement Options on the Upper Arm
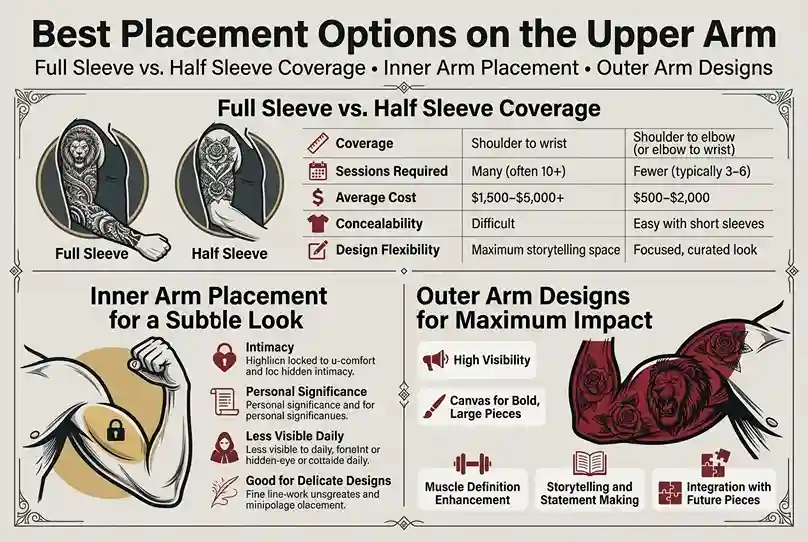
Full Sleeve vs. Half Sleeve Coverage
When it comes to upper arm tattoos, one of the biggest decisions you’ll make is how much real estate you want to cover. Full sleeves and half sleeves are two completely different commitments — not just in terms of time and money, but also in terms of visual impact and lifestyle considerations.
A full sleeve runs from the shoulder all the way down to the wrist, covering the entire arm in a cohesive design or a collection of connected pieces. This is the heavyweight option. It demands serious planning, multiple sessions (often spanning months or even years), and a significant financial investment. The payoff, though, is undeniable — a full sleeve tells a story, commands attention, and when done right, transforms your arm into a genuine work of art.
A half sleeve typically covers either the upper arm from shoulder to elbow, or the lower arm from elbow to wrist. For many guys, the upper half sleeve is the sweet spot. It gives you plenty of canvas to work with, sits beautifully on the bicep and tricep areas, and can be easily covered by a standard t-shirt when needed — handy for job interviews or family dinners.
| Feature | Full Sleeve | Half Sleeve |
|---|---|---|
| Coverage | Shoulder to wrist | Shoulder to elbow (or elbow to wrist) |
| Sessions Required | Many (often 10+) | Fewer (typically 3–6) |
| Average Cost | $1,500–$5,000+ | $500–$2,000 |
| Concealability | Difficult | Easy with short sleeves |
| Design Flexibility | Maximum storytelling space | Focused, curated look |
Neither option is better than the other — it all comes down to what fits your lifestyle, your pain tolerance, and how bold you want to go.
Inner Arm Placement for a Subtle Look
The inner arm — that softer, more sensitive stretch of skin running from your armpit down toward your elbow — is one of the most underrated spots for upper arm tattoos. Designs placed here are hidden unless you deliberately flex and turn your arm outward, making it a great choice if you want something personal that doesn’t broadcast itself to the world.
Why guys love inner arm placements:
- Intimacy — These designs are almost like private messages. You choose when to show them.
- Great for text and quote tattoos — The long, relatively flat surface is perfect for meaningful words or phrases that run vertically or horizontally.
- Ideal for detailed fine-line work — The skin here tends to be smoother, which works well with intricate designs.
One thing you should know going in — the inner arm hurts more than the outer arm. The skin is thinner, and there are nerves running close to the surface. It’s not unbearable for most people, but don’t let anyone tell you it’s a walk in the park either.
Design ideas that work especially well on the inner arm include:
- Single-line botanical illustrations
- Minimalist geometric shapes
- Script tattoos with meaningful lyrics, quotes, or dates
- Small portrait or face tattoos
- Abstract linework
If you’re building toward a sleeve, the inner arm becomes an essential puzzle piece that ties the whole composition together, filling in the natural wrap-around flow of the design.
Outer Arm Designs for Maximum Visibility
The outer arm is prime real estate. It’s the first thing people see when you’re walking down the street, sitting across from someone, or flexing at the gym (no judgment). If you want your tattoo to make an impression, this is where you put it.
The outer upper arm — covering the bicep, shoulder cap, and tricep — offers a naturally curved, muscular canvas that makes certain designs look absolutely incredible. Bold artwork pops here in a way it simply can’t in other locations.
Styles that thrive on the outer arm:
- Traditional and neo-traditional tattoos — The thick outlines and bold colors hold up perfectly against the natural light that hits this part of the arm constantly.
- Japanese irezumi designs — Dragons, koi fish, and florals wrap around the outer arm and shoulder in a way that feels completely natural.
- Realistic portraits and wildlife — The wider, flatter surface of the outer bicep is basically built for photorealistic work.
- Geometric and blackwork pieces — Sharp angles and bold patterns create stunning contrast against skin tone.
- Tribal designs — Polynesian, Maori, and similar styles were practically made for the shoulder and outer upper arm.
The outer arm is also generally less painful than the inner arm, which makes longer sessions more manageable. You’ll experience some discomfort near the elbow ditch and around the shoulder cap where the skin gets thinner, but the broad middle stretch of the outer bicep and tricep is surprisingly tolerable for most people.
Quick tip: If you want a design that looks great both flexed and relaxed, work with your artist to map out how the tattoo sits on the muscle. Some designs stretch and distort when the muscle is engaged, which can throw off the composition. A skilled artist will account for this during the planning stage.
Choosing the Right Design for Your Body Type
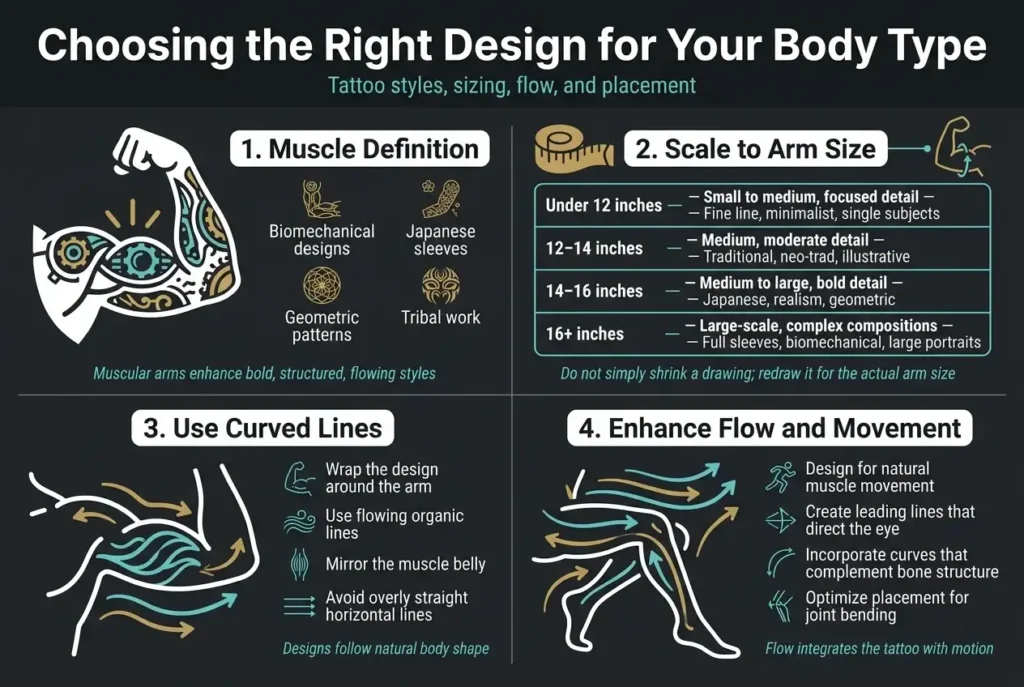
How Muscle Definition Enhances Certain Styles
The shape of your arm plays a bigger role in your tattoo’s final look than most people realize. If you’ve put in serious time at the gym, certain styles will work with your physique in ways that look almost three-dimensional when you flex.
Styles that pop on muscular arms:
- Biomechanical designs — The gears, pistons, and mechanical structures mirror the contours of underlying muscles, creating an almost anatomical illusion when the arm is flexed.
- Japanese sleeves — Bold, high-contrast elements like koi fish, dragons, and waves follow muscle groups naturally, giving the artwork a sense of movement.
- Geometric patterns — Sharp angles and symmetrical shapes align cleanly on a well-defined bicep, making the design look intentional and structured.
- Tribal work — Heavy black lines that wrap around the arm emphasize muscle separation, almost acting like a natural contour map of the arm itself.
On the flip side, if you’re working with a leaner build, fine-line styles, single-needle portraits, and minimalist designs tend to look incredibly clean and sharp. There’s no muscle bulk competing with the detail — just a crisp, gallery-worthy image sitting on skin.
One thing worth keeping in mind: bodies change. If you’re currently lean but plan to bulk up, go for designs with natural flow rather than rigid geometric symmetry. Symmetry can shift slightly as muscle mass grows, and curved organic designs tend to age better through physical changes.
Scaling Designs to Fit Your Arm Size
Size matters more in tattooing than in almost any other art form. A design that looks stunning in a reference image at full size can turn into a muddy mess when it’s crammed onto a smaller canvas — or look lost and underwhelming when it’s too small for a larger arm.
General sizing guidelines by arm circumference:
| Arm Circumference | Recommended Design Scale | Best Suited Styles |
|---|---|---|
| Under 12 inches | Small to medium, focused detail | Fine line, minimalist, single subjects |
| 12–14 inches | Medium, room for moderate detail | Traditional, neo-trad, illustrative |
| 14–16 inches | Medium to large, bold detail | Japanese, realism, geometric |
| 16+ inches | Large-scale, complex compositions | Full sleeves, biomechanical, large portraits |
When scaling a design, always work with your artist to resize it specifically for your arm — never ask them to simply “shrink” a design they’ve already drawn. A skilled artist will redraw or rework the piece so that line weights, spacing, and detail levels are appropriate for the actual size it’ll be tattooed at.
Fine details like thin lines, tight cross-hatching, or intricate text can blur over time if they’re packed too densely into a small space. This is especially true on the bicep, which stretches and flexes constantly. Bold outlines and solid fill areas hold up far better over the long run, regardless of arm size.
If you have a larger arm and you’re going with a standalone piece rather than a full sleeve, don’t be afraid to scale up. A small tattoo on a big arm can look unintentional, almost like an afterthought. Filling the real estate with a design that commands the space will always look more intentional and impactful.
Using Curved Lines to Complement Natural Contours
The upper arm is not a flat canvas. It’s a rounded, three-dimensional surface that changes shape every time you move. Designs that work with that natural curvature look like they were born on your skin. Designs that fight it can look awkward, distorted, or flat.
How to work with your arm’s natural shape:
- Wrap the design around the arm rather than placing it flat on one side. Tattoos that extend from the inner bicep to the outer shoulder have a sense of depth that flat placements can’t replicate.
- Use flowing organic lines — waves, vines, smoke, clouds, fire, and serpents all follow curves naturally. They look like they’re moving even when your arm is still.
- Mirror the muscle belly — For bicep-focused pieces, having the focal point sit right at the peak of the muscle creates a visual anchor that draws the eye exactly where you want it.
- Avoid overly straight horizontal lines that run across the widest part of the arm — they can look warped or slightly off-level when the arm is in a natural resting position.
Traditional Japanese tattooing has understood this concept for centuries. The art of “flow” in Japanese bodywork is built around dressing the body rather than decorating a flat surface. Even if you’re not going for a Japanese style, borrowing that philosophy — letting the design breathe and move with the body — will give any style a more organic, finished feel.
When you’re reviewing your artist’s stencil placement, look at it from multiple angles. Turn your arm inward, flex it, let it relax. The design should look good in motion, not just in the mirror with your arm held perfectly still.
Connecting Upper Arm Tattoos to Chest or Forearm Pieces
An upper arm tattoo doesn’t have to live in isolation. When done right, connecting it to chest or forearm work transforms individual pieces into a cohesive body art story — and dramatically changes the overall visual impact.
Connecting to the chest:
The shoulder cap is the natural bridge between the upper arm and the chest. Designs that flow from the chest over the shoulder and down into the upper arm create what’s called a chest-to-sleeve transition. Some common ways artists achieve this:
- Extending background elements — clouds, water, smoke, or floral patterns that spread across the pec and onto the deltoid.
- Using a single large motif — a dragon or eagle that spans both the chest and the upper arm, with the body or wings wrapping over the shoulder.
- Framing with black-and-grey fill — solid dark shading or negative space that bleeds from a chest piece across the shoulder joint.
Connecting to the forearm:
The elbow ditch (the inner elbow) is the connection point most people worry about — and understandably so. It’s a high-movement, high-crease area that doesn’t hold ink the same way as flatter surfaces. Here’s how to handle it:
| Connection Strategy | Best For | Things to Watch |
|---|---|---|
| Bold linework through the elbow | Traditional, tribal, geometric | Needs touch-ups more often |
| Background fill only (no focal subjects) | All styles | Fades faster in the crease |
| Leaving a natural gap at the elbow | Large-scale sleeves | Looks intentional, avoids distortion |
| Blending shading through the ditch | Realism, Japanese | Works well if shading is loose and open |
If you’re planning a full sleeve eventually, think about your upper arm placement with that end goal in mind from the start. A piece slapped on without any thought about future connections will force you — or your artist — to make awkward compositional compromises down the road. Even if you’re only getting one piece now, tell your artist your long-term vision. A great tattooer will position and design your current piece with room to grow.
What to Expect During the Tattooing Process
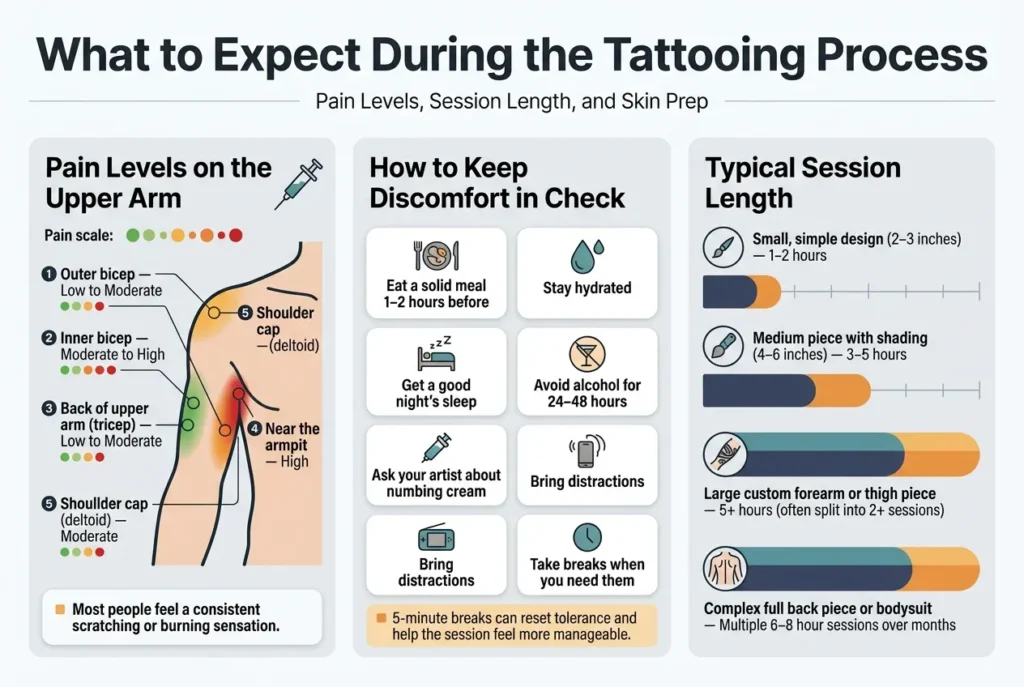
Pain Levels and How to Manage Discomfort
The upper arm is actually one of the more forgiving spots to get tattooed, which is great news if this is your first piece or you’re expanding an existing sleeve. The outer bicep and the meatier parts of the upper arm sit over thick muscle, which acts as a natural cushion between the needle and your bone. Most guys describe the sensation as a consistent scratching or burning feeling — annoying but very manageable.
That said, not every part of the upper arm feels the same under the needle:
| Area | Pain Level | Notes |
|---|---|---|
| Outer bicep | Low to Moderate | Fleshy, well-padded — great for beginners |
| Inner bicep | Moderate to High | Thinner skin, closer to nerve endings |
| Back of upper arm (tricep) | Low to Moderate | Usually tolerable, skin is thicker here |
| Near the armpit | High | Very sensitive — avoid if pain-tolerant is not your thing |
| Shoulder cap (deltoid) | Moderate | Closer to bone makes it slightly sharper |
Tips to Keep Discomfort in Check
- Eat a solid meal 1–2 hours before your session. Low blood sugar makes everything feel worse. A meal with protein and carbs keeps your energy stable and your threshold higher.
- Stay hydrated. Well-hydrated skin is easier to tattoo and heals faster. Drink plenty of water in the days leading up to your appointment.
- Get a good night’s sleep. A rested body handles pain more efficiently. Showing up exhausted is a guaranteed way to make the experience harder than it needs to be.
- Avoid alcohol for at least 24–48 hours beforehand. Alcohol thins the blood, making you bleed more during the session. It also dehydrates you, which tightens the skin and makes tattooing harder for your artist.
- Talk to your artist about numbing cream. Topical anesthetics like EMLA or similar products can be applied 45–60 minutes before the session starts. Not every artist loves them since they can change skin texture slightly, so always get the okay from your artist first.
- Bring distractions. Headphones, a podcast, or even just light conversation with your artist can shift your focus away from the sensation significantly.
- Take breaks when you need them. There’s no award for toughing it out without stopping. A 5-minute break to breathe, drink some water, or have a snack can reset your tolerance and make the rest of the session feel more manageable.
Typical Session Length for Upper Arm Tattoos
Session time varies widely depending on the complexity and size of the design, but here’s a realistic breakdown of what to expect:
| Tattoo Size & Style | Estimated Session Time |
|---|---|
| Small, simple design (2–3 inches) | 1–2 hours |
| Medium piece with shading (4–6 inches) | 2–4 hours |
| Large detailed design (half sleeve, detailed realism) | 4–8 hours |
| Full sleeve | Multiple sessions — 15–30+ hours total |
| Black and grey with fine line work | Shorter sessions, less trauma to skin |
| Color tattoos with heavy saturation | Longer sessions, more passes over skin |
A few things worth knowing:
- Breaks add time. If you need frequent breaks, factor that into your planning. It’s totally normal and your artist expects it.
- Your artist’s speed matters. A highly experienced artist might work more efficiently without sacrificing quality, while a slower, more deliberate approach often produces cleaner fine line work.
- Your skin’s reaction plays a role. Some skin types hold up better under extended sessions. If your skin starts to swell, redden excessively, or become too irritated, your artist may recommend stopping and continuing in a second session. This is actually the smart move — overworked skin doesn’t take ink as well and heals messier.
- Bigger isn’t always longer. A bold, simple tribal design covering a large area can sometimes be completed faster than a small, hyper-detailed portrait. Complexity, not just size, drives session length.
If you’re planning a large piece or sleeve, have a real conversation with your artist about breaking the work into multiple sittings. This gives your skin recovery time and often produces a cleaner, more vibrant finished result.
How to Prepare Your Skin Before Your Appointment
Walking in with well-prepped skin makes a genuine difference in how the tattoo goes down and how well it heals afterward. Think of it like prepping a canvas — the better the surface, the cleaner the result.
In the Days Before Your Appointment
- Moisturize daily starting about a week out. Hydrated skin accepts ink more smoothly and heals with better color retention. Use an unscented lotion — something like Lubriderm, Aveeno, or CeraVe works perfectly. Skip anything with heavy fragrances or active ingredients like retinol or AHAs, which can make skin more sensitive.
- Stay out of the sun. Sunburned or even heavily tanned skin is not ideal for tattooing. UV damage alters the skin’s surface texture and makes it harder for ink to sit cleanly. If sun exposure is unavoidable, keep the area covered or use high-SPF sunscreen consistently.
- Shave the area if needed — or let your artist do it. Most tattoo artists will shave the area themselves as part of their prep routine, but if you have particularly thick arm hair, a light shave the day before (not the morning of) gives the skin a chance to recover from any minor irritation.
- Skip exfoliating scrubs on the target area a few days before. Fresh skin from heavy exfoliation can be more sensitive during tattooing. Keep your skin care routine simple in the days leading up to your appointment.
On the Day of Your Appointment
- Shower and clean the area thoroughly. Show up with clean skin, free from lotion, deodorant (especially if you’re getting work near the armpit or shoulder), or any other product. Your artist will clean the area again, but starting fresh makes their job easier.
- Wear the right clothes. For upper arm work, a sleeveless shirt or a loose-fitting t-shirt you don’t mind getting ink on is ideal. Tight sleeves will be in the way and may need to be cut — some artists will do this, but it’s better to dress smart from the start.
- Skip the gym that morning. Freshly pumped muscles can make the skin surface uneven and trickier to tattoo. Working out also raises body temperature and increases blood flow to the muscles, neither of which helps. Save the workout for after you’ve healed.
- Don’t apply moisturizer or any lotion on the morning of your session. Clean, product-free skin is what your artist needs to work with. Lotion creates a barrier that can interfere with stencil adhesion and ink placement.
Getting these basics right isn’t complicated, but the difference between prepped skin and skin that hasn’t been taken care of is something experienced tattoo artists notice immediately — and it shows up in the final result.
Essential Aftercare Tips to Protect Your Investment.
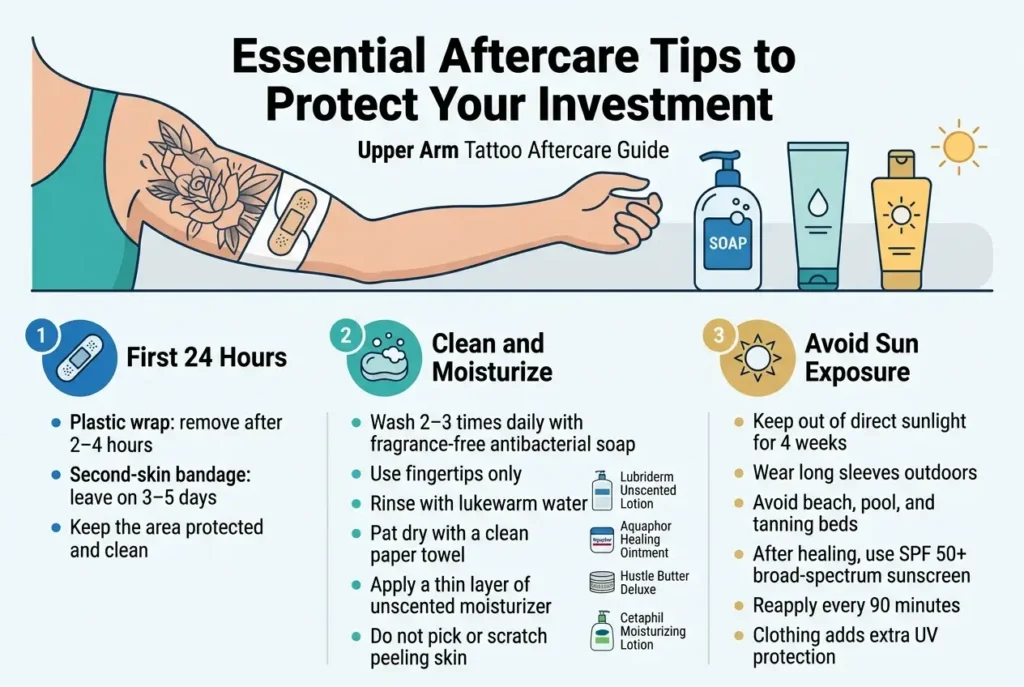
Keeping Your Tattoo Clean and Moisturized
The first two weeks after getting your upper arm tattoo are absolutely critical. What you do during this healing window will directly impact how sharp and vibrant your ink looks for years to come.
The First 24 Hours
Your artist will wrap your tattoo with either plastic wrap or a specialized second-skin bandage like Saniderm or Tegaderm. If you’re using traditional plastic wrap, remove it after 2–4 hours. If your artist applied a second-skin bandage, you can typically leave it on for 3–5 days — it’s genuinely one of the better innovations in tattoo aftercare.
Cleaning Your New Tattoo
- Wash the tattooed area 2–3 times daily using a fragrance-free, antibacterial soap like Dr. Bronner’s unscented castile soap or Dial Gold
- Use only your fingertips — no washcloths, loofahs, or sponges that can harbor bacteria and cause irritation
- Rinse with lukewarm water (hot water opens pores and can pull ink out)
- Pat dry gently with a clean paper towel rather than a cloth towel, which can snag on the healing skin
Moisturizing the Right Way
Once the skin is fully dry, apply a thin layer of unscented moisturizer. Less is genuinely more here — slathering on too much product suffocates the skin and slows healing.
Great options include:
| Product | Why It Works |
|---|---|
| Lubriderm Unscented Lotion | Lightweight, absorbs fast, widely available |
| Aquaphor Healing Ointment | Excellent for the first few days when skin feels tight |
| Hustle Butter Deluxe | Tattoo-specific formula, vegan-friendly |
| Cetaphil Moisturizing Lotion | Gentle, non-comedogenic, great for sensitive skin |
Avoid anything with alcohol, heavy fragrance, or petroleum jelly (like plain Vaseline) beyond the very first day. Petroleum-based products can clog pores and cause breakouts around the tattoo area.
Your tattoo will peel and flake during weeks 1–2, similar to a sunburn. Do not pick or scratch the flaking skin. Let it shed naturally. Picking pulls ink out of the dermis and leaves patchy, faded spots that require a touch-up.
Avoiding Sun Exposure to Prevent Fading
UV rays are hands-down the biggest long-term threat to the look of your tattoo. The sun breaks down the pigment molecules in the ink sitting beneath your skin, causing colors to wash out and black linework to blur and turn a greenish-grey over time.
During the Healing Phase
For the first 4 weeks, keep your tattoo completely out of direct sunlight. This means:
- Wearing a long-sleeved shirt when outdoors
- Avoiding beach days, pool days, or any prolonged outdoor activities
- Steering clear of tanning beds entirely
Even brief exposure on an unhealed tattoo can cause serious damage — the skin is essentially an open wound at this stage, and sunburn on top of that is genuinely painful and harmful.
After the Tattoo Has Healed
Once healed (typically 4–6 weeks), sunscreen becomes your tattoo’s best friend. Here’s what to look for:
- SPF 50 or higher — don’t go lower
- Broad-spectrum protection (covers both UVA and UVB rays)
- Mineral-based sunscreens with zinc oxide or titanium dioxide offer superior protection without irritating the skin
- Reapply every 90 minutes during outdoor activities
Some good tattoo-specific sunscreen options include Ink Guard Tattoo Sunscreen SPF 50+ and Tattoo Goo SPF 50+ Sunscreen Lotion. That said, a regular high-quality mineral SPF 50 sunscreen works just as well.
Pro tip: If you’re spending a full day outdoors, cover the tattoo with clothing where possible in addition to sunscreen. Clothing provides a physical UV barrier that no sunscreen can fully replicate.
Recognizing Signs of Infection Early
Most tattoos heal without any major drama, but infections do happen — especially when aftercare instructions get ignored or the environment wasn’t sterile during the tattooing process. Catching a problem early makes all the difference.
Normal Healing vs. Warning Signs
It can be tricky to tell what’s normal healing and what’s a problem. Here’s a quick breakdown:
| What’s Normal | What’s a Red Flag |
|---|---|
| Redness directly around the tattoo (first 3–5 days) | Redness spreading outward beyond the tattoo edges |
| Mild swelling in the area | Significant swelling that gets worse after day 3 |
| Clear or slightly yellow fluid weeping from skin | Thick, green or yellow pus discharge |
| Itching as the skin heals | Hot skin to the touch that doesn’t cool down |
| Light peeling and flaking | Raised, painful bumps or blisters |
| Mild soreness | Fever, chills, or feeling generally unwell |
What To Do If You Suspect an Infection
- Stop applying any aftercare products other than gently cleaning the area
- Do not cover the tattoo tightly with bandages
- See a doctor as soon as possible — a mild bacterial infection is usually treated effectively with a short course of oral antibiotics
- Don’t try to treat it with home remedies or wait it out
One important thing: allergic reactions to ink are different from infections. An allergic reaction typically shows up as a rash or raised, itchy patches specifically over certain colors — red and yellow ink are the most common culprits. This also warrants a visit to a dermatologist rather than just pushing through.
Long Term Touch Up and Maintenance Advice
A great tattoo is a long-term relationship, not a one-time event. Even the best work in the world will show some wear over time — that’s just the nature of living in a human body. The good news is that with a bit of attention, your upper arm tattoo can look sharp for decades.
When to Consider a Touch-Up
Most tattoo artists will do a complimentary touch-up within 2–3 months of your original session, assuming the tattoo healed properly under your care. This is the time to address:
- Any areas where ink didn’t fully set (patchiness)
- Lines that healed thinner than intended
- Small spots where color faded unevenly
Beyond that initial touch-up, expect to revisit your tattoo every 5–10 years depending on a few factors:
- Ink colors: Black and grey hold up the longest. Reds, yellows, and whites fade faster
- Sun exposure: More sun = faster fading
- Skin type: Oily skin tends to push ink out slightly faster than dry skin
- Tattoo placement: Areas with more friction (like the inner arm) may need touch-ups sooner than the outer arm
Daily Habits That Help Your Tattoo Age Well
- Moisturize regularly — dry, cracked skin dulls the appearance of ink
- Wear SPF daily, even on cloudy days
- Stay hydrated — skin that’s hydrated from the inside holds color better
- Maintain a stable body weight where possible, since significant weight fluctuations can stretch and distort tattoo designs
Choosing the Right Artist for Touch-Ups
Ideally, go back to your original artist for any significant touch-up work. They know the design, the ink colors used, and the specific approach taken. If that’s not possible — say, your original artist has moved or retired — bring reference photos and detailed notes to your new artist so they can match the existing work as closely as possible.
One last thing: don’t rush a touch-up. Waiting until the tattoo is fully, completely healed before assessing what actually needs fixing saves both your skin and your money. What looks like a problem at week three often resolves itself by week six.
Finding the Right Tattoo Artist for Your Vision

Reviewing Portfolios to Match Your Preferred Style
Finding a tattoo artist isn’t just about picking someone who can hold a machine — it’s about finding someone whose natural artistic strengths line up with exactly what you want on your arm. Every tattoo artist has a style they genuinely excel at, and trying to force a realism specialist to do a crisp Japanese traditional piece (or vice versa) rarely ends well for anyone.
Start by spending real time on Instagram, the artist’s website, and any physical portfolio books at the shop. You’re not just glancing — you’re studying.
Things to look for when reviewing portfolios:
- Consistency — Does the quality stay high across multiple healed pieces, or does it spike and dip? Anyone can have one great photo.
- Healed tattoo photos — Fresh tattoos always look sharp. Ask specifically if they have photos of healed work. This tells you far more about the long-term quality.
- Style match — If you want blackwork geometric, look for lots of clean lines, precise symmetry, and sharp negative space in their portfolio. If you want American traditional, look for bold outlines, flat color fills, and classic iconography done confidently.
- Scale awareness — Check if they’ve done work on the upper arm specifically. Wrapping a design around the bicep or positioning it correctly on the shoulder cap requires spatial thinking that not every artist has sharpened.
- Skin tone diversity — If the artist has tattooed a range of skin tones, that’s a good indicator of experience. Certain colors and techniques require adjustment depending on skin tone, and an experienced artist knows this.
Don’t be shy about reaching out to ask for more examples of a specific style. A confident, professional artist will have no problem sharing more of their work.
Key Questions to Ask Before Booking
Booking a tattoo appointment without asking questions is like hiring a contractor without getting a quote or seeing past projects. A quick conversation — whether in person, by DM, or through email — can save you from a lot of regret.
Questions worth asking every artist:
- “Can I see more examples of [specific style] you’ve done?” — Always okay to ask. If they get defensive, that’s a red flag.
- “How do you handle touch-ups if something doesn’t heal well?” — Many reputable artists offer one free touch-up session. Know the policy before you commit.
- “How long do you think this design will take?” — This helps with scheduling and gives you a rough sense of cost. It also tells you whether the artist is being realistic or rushing.
- “Will you draw a custom design, or do you work from references I bring?” — Some artists love working from scratch; others prefer adapting reference images. Know which type you’re dealing with.
- “What’s your minimum charge?” — Small pieces often cost a flat rate regardless of time, so understanding this upfront prevents awkward surprises.
- “Do you have any restrictions on design types?” — Some artists won’t tattoo certain imagery or styles they don’t connect with. It’s better to know now than to feel rejected mid-consultation.
- “What should I do to prepare for the session?” — Sleep well, eat a solid meal, moisturize the skin in the days leading up — a good artist will walk you through this, and asking shows you’re serious.
A consultation (even a short one) before booking is the standard for custom work. Any shop doing quality tattooing will expect and welcome this. Walk-in flash pieces are a different story, but for upper arm work that you’re going to wear for life, take the time.
Understanding Pricing and What Affects the Cost
Tattoo pricing can feel confusing from the outside, but once you understand the variables, it starts to make total sense. Good tattooing isn’t cheap, and cheap tattooing rarely turns out good — that’s as close to a universal truth as this industry has.
The main factors that drive tattoo pricing:
| Factor | How It Affects Cost |
|---|---|
| Artist experience & reputation | More experienced or in-demand artists charge higher hourly rates |
| Design complexity | Intricate details, realistic shading, or fine-line work takes longer |
| Size of the tattoo | Larger pieces require more time and ink |
| Color vs. black & grey | Full color work typically takes more time than black and grey |
| Number of sessions | Sleeve work or large pieces are often split across multiple sessions |
| Geographic location | Tattoo rates in major cities like NYC or LA tend to run higher than smaller markets |
| Custom vs. flash | Custom designs require design time that factors into the overall price |
Typical pricing structures you’ll encounter:
- Hourly rate — Most common for medium to large pieces. Rates can range from $100/hour on the lower end to $300+/hour for highly sought-after artists.
- Day rate — Some artists charge a flat rate for a full day (usually 6–8 hours of actual tattooing). This can work out in your favor for large-scale upper arm or sleeve work.
- Flat/minimum rate — Applied to small or quick pieces regardless of how little time they take.
A few things worth keeping in mind about pricing:
- Tipping is standard in tattooing. A 15–20% tip is the norm for good work. If an artist blew your mind, tip accordingly.
- Deposits are almost always required to book custom work. These are typically non-refundable if you cancel without sufficient notice. They’re deducted from your final total if you show up and follow through.
- Cheaper isn’t a deal — it’s usually a warning sign. A skilled artist who charges fairly is protecting the integrity of their craft. If someone is dramatically undercutting the market, ask yourself why.
- Splitting large upper arm pieces across multiple sessions is smart for both your budget and your skin. Your body heals better when it isn’t overwhelmed in a single marathon session.
Getting a tattoo on your upper arm is an investment in something you’ll carry with you every day. Treating the artist selection and pricing conversation with the same seriousness as any other major purchase just makes sense.
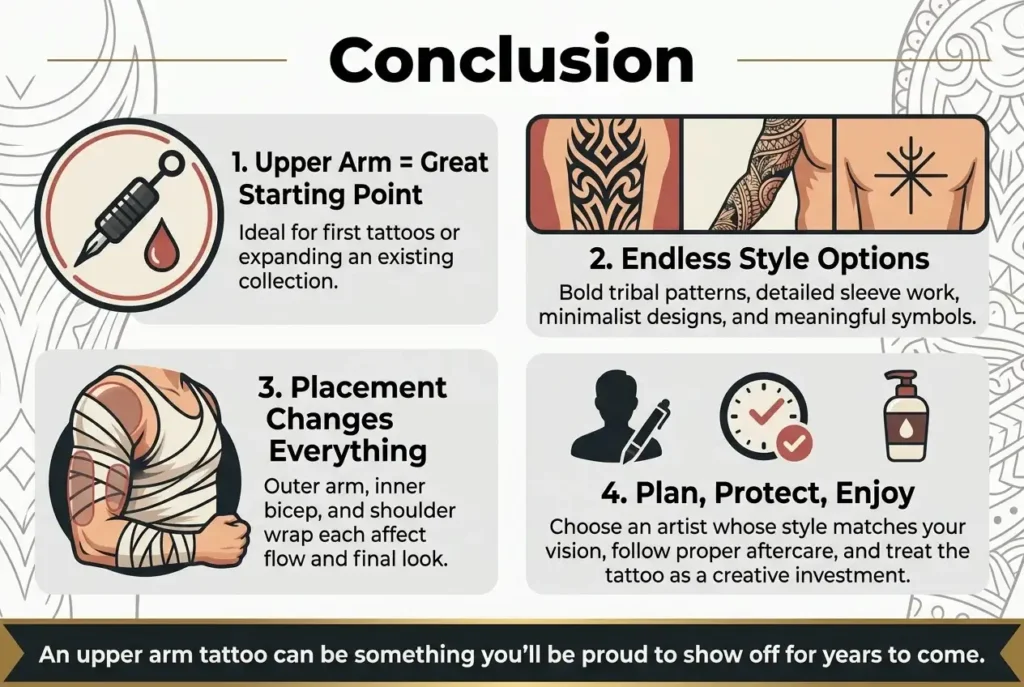
Upper arm tattoos are one of the most versatile and eye-catching choices a guy can make. From bold traditional designs to detailed realism, the style you pick, where you place it, and how well it suits your body all play a huge role in how the final piece looks. Pair that with finding a skilled artist who truly gets your vision, and you’re already halfway to a tattoo you’ll love for life.
The real secret to a great tattoo is in the details — doing your research, choosing an artist whose portfolio speaks to you, and taking aftercare seriously once the work is done. Don’t rush the process. A little patience and planning now means you walk away with ink that looks just as good years down the road as it did on day one.
📌 Explore More Tattoo Guides
- If you’re considering your first upper arm tattoo, starting with a first tattoo placement is a great way to test placement and pain tolerance.
- Love bold, timeless ink? Check out our deep dive into Traditional tattoos.
- The iconic imagery like eagles, panthers, and anchors are hallmarks of the American Traditional style.
- Explore powerful designs inspired by this majestic bird in our guide to eagle tattoos for men.
- For a bold, predatory look, panther tattoos for men are a timeless choice.
- Discover the deep nautical history of swallow tattoos on shoulders.
- If you’re drawn to symmetry and precision, geometric tattoo designs offer endless possibilities.
- Wildlife portraits are incredibly popular — check out our guide to lion chest tattoos for men.
- Wolves are one of the most requested subjects, and our collection of wolf forearm tattoos showcases hyper-detailed animal portraiture.
- For a darker aesthetic, explore scary tattoos for men.
- Japanese tattoos — or Irezumi — are among the most respected styles worldwide. Explore Japanese tattoos for men.
- Connecting your upper arm piece to your chest creates a cohesive look. See chest tattoos for men.
- The forearm is the most popular placement for first tattoos. Check out forearm tattoos for men.
- Planning a full sleeve? Get sleeve tattoo ideas to plan a cohesive design.
- Choosing the right artist is crucial — meet our team of tattoo experts.
- Need help finding an artist? Contact us for recommendations.
- Ready to find your next tattoo? Explore more tattoo ideas on the Tattoos House blog.
- Browse our complete HTML sitemap to explore all categories.
- My Pintrest for more Tattoos Follow Us